How to Bleed a Hydraulic System: Step-by-Step Guide for Garage Tools (2026)
Bleeding a hydraulic system—critical for Auto-Hydra shop presses, car lifts, and jacks—involves locating air pockets, opening bleed valves, cycling the hydraulic mechanism, and verifying pressure, ensuring safe, efficient operation for U.S. garage tools.
Introduction: Why Learning How to Bleed a Hydraulic System Matters
If you own a hydraulic shop press, car lift, or jack, you know these tools are the backbone of your U.S. garage or repair shop. But over time, air can seep into the hydraulic system—causing spongy controls, slow operation, or even complete failure. Air pockets disrupt pressure flow, reduce lifting/pressing power, and increase wear on seals and cylinders.
Learning how to bleed a hydraulic system isn’t just a maintenance task—it’s a safety necessity. For U.S. DIYers, mechanics, and shop owners, proper bleeding ensures your tools (from 12-ton shop presses to 9,000-lbs car lifts) perform at their best, last longer, and keep you safe on the job. This step-by-step guide breaks down the process for common hydraulic tools, with U.S.-specific tips and product-focused instructions.
What You’ll Need to Bleed a Hydraulic System (U.S. Garage Essentials)
Before you start, gather these tools and supplies—most of which you likely already have in your U.S. garage:
✅ Safety glasses and gloves (protect against hydraulic fluid splashes)
✅Auto-Hydra recommended hydraulic fluid (check your tool’s manual—we use high-quality, U.S.-compliant fluid in all our tools)
✅ Funnel and fluid catch pan (to avoid spills and contamination)
✅ Wrenches (to open/close bleed valves—match to your Auto-Hydra tool’s valve size)
✅ Clean rags (for wiping up spills)
✅ Owner’s manual for your specific tool (shop press, car lift, or jack)
Pro Tip: Always use the hydraulic fluid specified in your tool’s manual. Using the wrong fluid can damage seals and void your warranty.
Step-by-Step Guide: How to Bleed a Hydraulic System (Auto-Hydra Tools Focus)
The bleeding process varies slightly by tool, but the core principle is the same: remove trapped air from the hydraulic lines and cylinders. Below are detailed instructions for the most popular Auto-Hydra hydraulic tools used in U.S. garages:
1. Bleeding an Auto-Hydra Hydraulic Shop Press
Auto-Hydra’s shop presses (12T, 20T, 30T, 50T) are workhorses for U.S. garages—used for pressing bearings, straightening metal, and more. Here’s how to bleed their hydraulic systems:
Step 1: Prepare the Shop Press
● Park the press on a level concrete floor (standard in U.S. garages) and ensure it’s disconnected from power (if electric) or the air supply (if air-powered).
● Locate the hydraulic fluid reservoir—on Auto-Hydra shop presses, it’s typically on the side of the H-frame.
● Check the fluid level: it should be between the “MIN” and “MAX” marks. Top off with Auto-Hydra recommended hydraulic fluid if needed.
Step 2: Locate the Bleed Valve
● Refer to your manual to find the bleed valve—on Auto-Hydra shop presses, it’s near the hydraulic cylinder or pump.
● Attach a clear hose to the bleed valve (optional but helpful for seeing air bubbles) and place the other end in the fluid catch pan.
Step 3: Cycle the Press to Release Air
● Slowly pump the manual handle (or activate the electric/air pump) to raise the ram to its maximum height.
● Hold the ram at full extension for 10 seconds—this forces air toward the bleed valve.
● Use a wrench to open the bleed valve 1/4 turn. You’ll see air bubbles and fluid escape into the catch pan.
● Close the valve once fluid flows steadily (no more bubbles).
● Lower the ram slowly and repeat the process 2–3 times until no air bubbles are visible.
Step 4: Verify and Clean Up
● Check the fluid level again and top off if necessary.
● Test the press by pressing a small load—it should operate smoothly with no sponginess.
● Wipe up any spilled fluid with a clean rag.
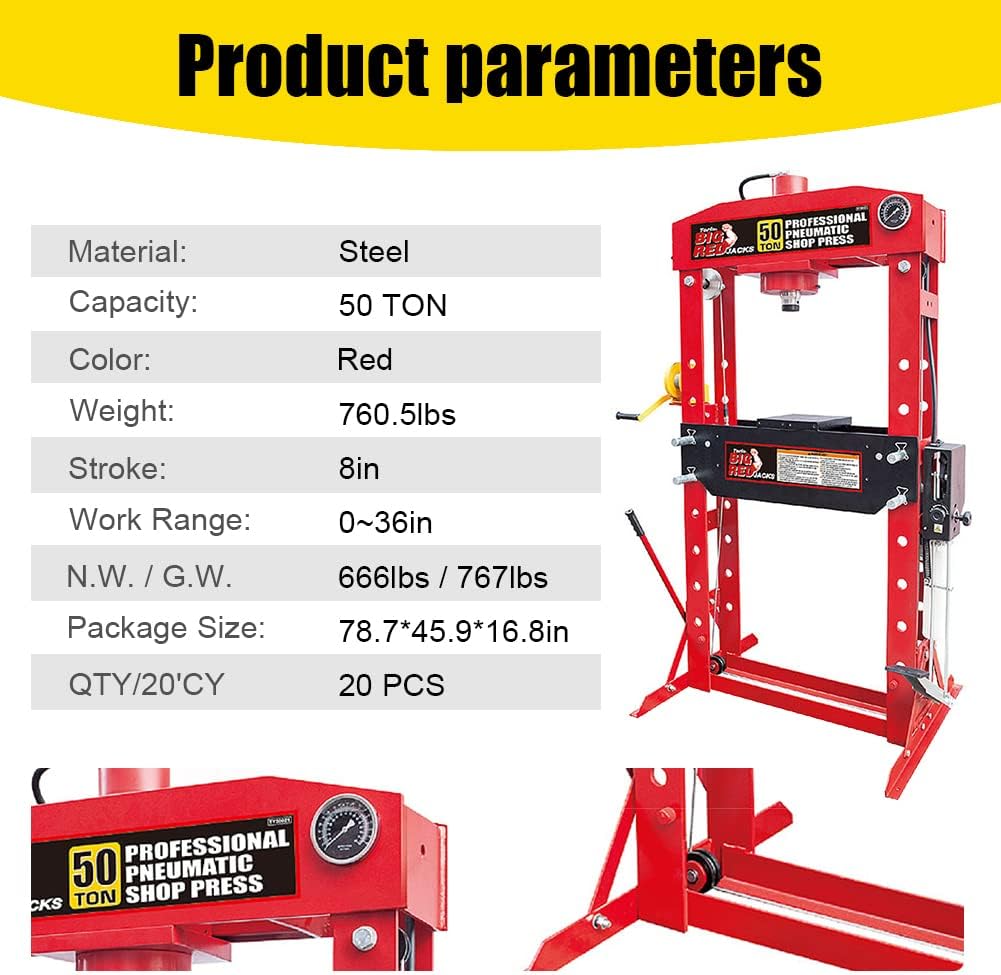
👉Shop Auto-Hydra Hydraulic Shop Presses – All models feature easy-access bleed valves for simple maintenance.
2. Bleeding an Auto-Hydra Hydraulic Car Lift
Auto-Hydra’s 2-post and 4-post car lifts (9,000-lbs capacity) are essential for U.S. repair shops. Bleeding their hydraulic systems ensures safe, stable lifting:
Step 1: Prepare the Car Lift
● Ensure the lift is on a level, 3000 PSI concrete floor (required for U.S. commercial use).
● Lower the lift to its lowest position and disconnect power.
● Locate the hydraulic fluid reservoir (on top of the power unit for most Auto-Hydra models) and check the fluid level—top off with recommended fluid.
Step 2: Access Bleed Valves
● Auto-Hydra car lifts have bleed valves on each hydraulic cylinder (two for 2-post lifts, four for 4-post lifts).
● For 2-post lifts: Start with the cylinder furthest from the power unit.
● Attach clear hoses to each valve and route to the catch pan.
Step 3: Bleed Each Cylinder
● Activate the lift’s pump to raise the platform 6–12 inches.
● Open the first bleed valve 1/4 turn—allow fluid and air to escape until no bubbles remain, then close the valve.
● Repeat for the second (and additional) cylinders.
● Raise the lift to full height, hold for 10 seconds, and bleed each valve again to remove any remaining air.
Step 4: Test the Lift
● Lower the lift slowly and check for smooth operation.
● Test lifting a light vehicle (or use the lift’s test mode) to ensure even, stable movement.
● Recheck fluid level and clean up spills.
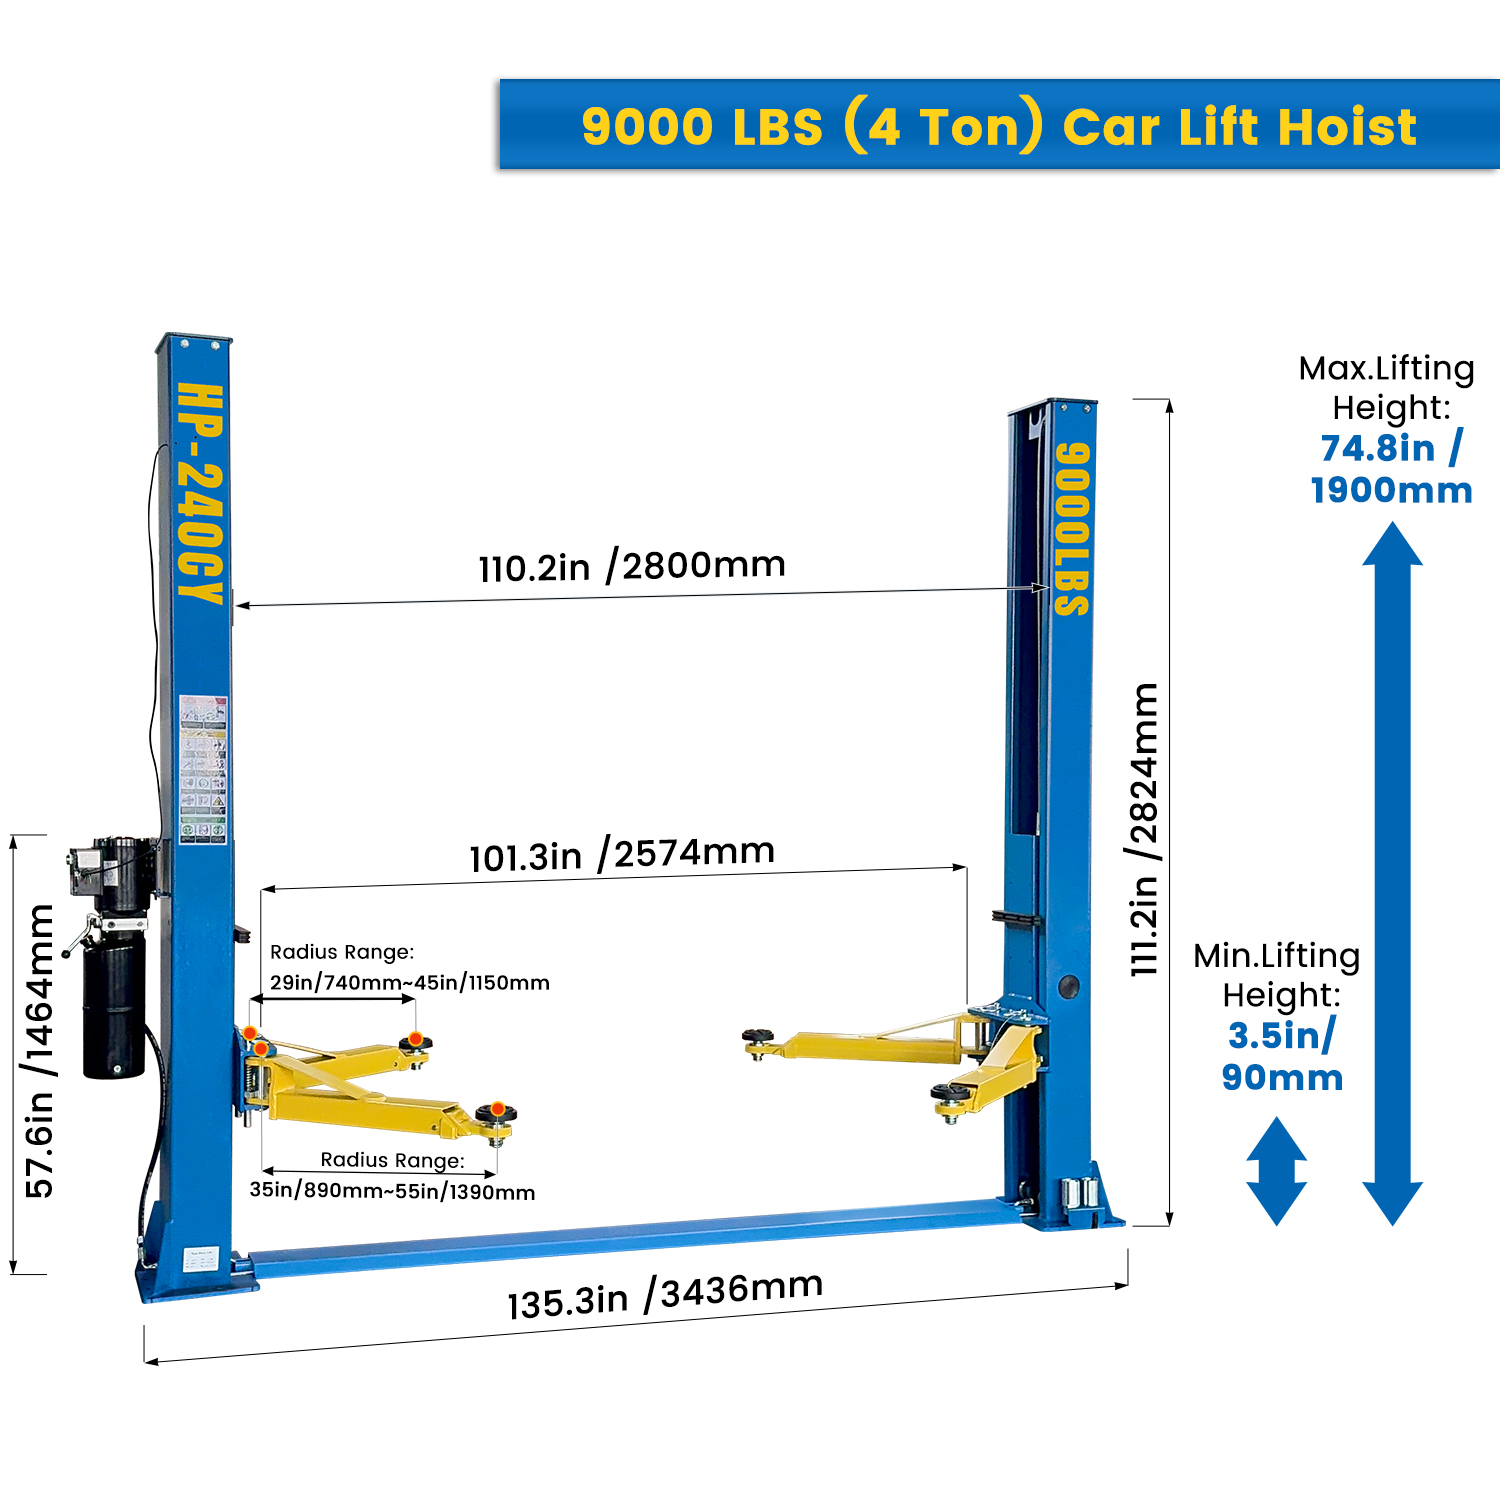
👉Shop Auto-Hydra Hydraulic Car Lifts – CE-certified models with accessible bleed valves for U.S. shop compliance.
3. Bleeding an Auto-Hydra Hydraulic Jack
Auto-Hydra’s hydraulic jacks are portable and versatile—used for U.S. roadside repairs and garage projects. Here’s how to bleed them:
Step 1: Prepare the Jack
● Place the jack on a level surface and fully lower the ram.
●Locate the fluid fill plug (on the side of the jack) and remove it to check the level—top off with recommended fluid.
● Find the bleed screw (usually near the fluid fill plug).
Step 2: Bleed the Jack
● Turn the bleed screw counterclockwise 1/2 turn.
● Pump the jack handle rapidly 10–15 times—this forces air out through the bleed screw.
● Turn the bleed screw clockwise to close it.
● Pump the handle to raise the ram fully, then lower it slowly.
● Repeat the process 2–3 times until the jack operates smoothly.
Step 3: Final Checks
● Recheck fluid level and replace the fill plug.
● Test the jack by lifting a small load—ensure it holds pressure and lowers evenly.
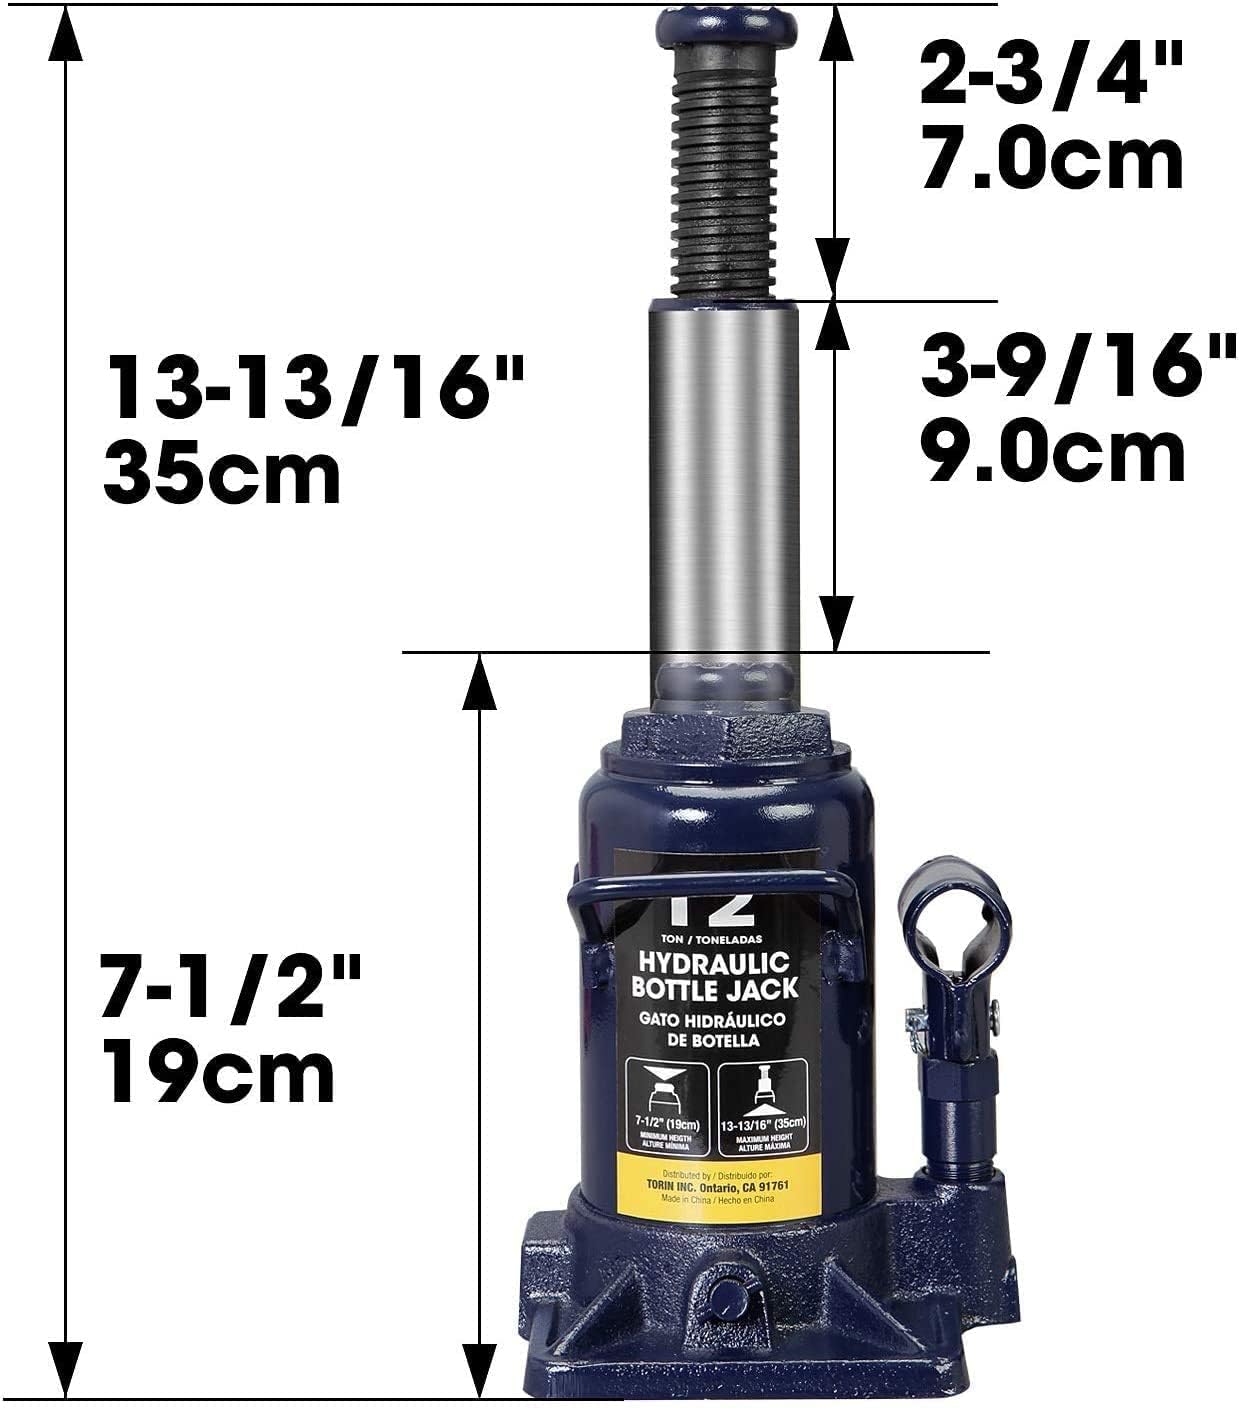
👉Shop Auto-Hydra Hydraulic Jacks – Portable models with easy bleed screws for U.S. DIYers.
U.S.-Specific Tips for Bleeding Hydraulic Systems
✅Climate Considerations: In cold U.S. states (Minnesota, Michigan), warm the hydraulic fluid to room temperature before bleeding—cold fluid traps more air. In humid states (Florida, Texas), store fluid in sealed containers to avoid moisture contamination.
✅Frequency: Bleed your Auto-Hydra tools every 6 months (or after 50 hours of use) for U.S. commercial shops, or annually for DIY garages. Bleed immediately if you notice sponginess or slow operation.
✅Safety Compliance: For U.S. commercial shops, keep a maintenance log of bleeding dates to meet OSHA safety requirements.
✅Fluid Disposal: Dispose of used hydraulic fluid at a U.S. hazardous waste facility—never pour it down drains or on the ground.
When to Seek Professional Help (U.S. Support)
If you’ve followed these steps and your Auto-Hydra hydraulic system still has issues (e.g., persistent air bubbles, fluid leaks, or no pressure), it may be time to contact a professional. Auto-Hydra offers U.S.-based technical support and a 2–3 year parts replacement warranty on most tools. Common signs you need help:
❌ Hydraulic fluid leaks (indicates a damaged seal or hose)
❌ Bleeding doesn’t improve performance
❌ Strange noises during operation (grinding, hissing)
👉 Contact Auto-Hydra’s U.S. support team via phone or WhatsApp for personalized assistance.
FAQs – How to Bleed a Hydraulic System (U.S. Buyers Ask)
Q1: How often should I bleed my shop press’s hydraulic system?
A: For U.S. commercial shops using the press daily, bleed every 6 months. For DIY garages (occasional use), annually is sufficient. Bleed immediately if you notice spongy controls or slow pressing.
Q2: Can I use any hydraulic fluid to bleed my car lift?
A: No—use only the fluid specified in the owner’s manual. Auto-Hydra recommends U.S.-compliant hydraulic fluid that meets ISO standards to protect seals and maintain warranty coverage.
Q3: Do I need special tools to bleed a hydraulic jack?
A: No—basic wrenches, a catch pan, and clean rags are enough. Auto-Hydra jacks have easily accessible bleed screws that don’t require specialized tools.
Q4: Why is my hydraulic system still spongy after bleeding?
A: You may have missed an air pocket, or there’s a leak allowing air to re-enter. Check for loose hoses or damaged seals, and repeat the bleeding process—focus on cycling the tool multiple times to release trapped air.
Q5: Is bleeding a hydraulic system safe for U.S. DIYers?
A: Yes, if you follow safety steps (wear glasses/gloves, work on level ground, disconnect power). Auto-Hydra tools are designed with user-friendly bleed valves to make the process simple for U.S. DIYers.
Q6: Can I bleed my engine hoist using the same steps?
A: Yes—engine hoists use similar hydraulic systems. Follow the shop press bleeding steps, focusing on the hoist’s cylinder and bleed valve. Refer to your engine hoist’s manual for specific valve locations.
👉Shop Auto-Hydra Engine Hoist – Hydraulic models with easy maintenance features.
Conclusion: Master Hydraulic Bleeding for Longer-Lasting Auto-Hydra Tools
Learning how to bleed a hydraulic system is a simple, essential skill for any U.S. garage owner or mechanic. Proper bleeding keeps your Auto-Hydra shop press, car lift, jack, or engine hoist operating safely and efficiently, reducing downtime and extending tool life. By following this guide, you’ll ensure your hydraulic tools perform at their best for years to come.
Auto-Hydra’s U.S.-engineered hydraulic tools are designed with easy maintenance in mind—from accessible bleed valves to durable components that stand up to U.S. garage demands. Whether you’re a DIY enthusiast in California or a commercial mechanic in Texas, our tools are built to last with proper care.
Ready to Upgrade Your U.S. Garage Tools?
✅Shop Auto-Hydra Hydraulic Shop Presses
✅ Shop Auto-Hydra Hydraulic Car Lifts
✅ Shop Auto-Hydra Hydraulic Jacks
✅ Shop Auto-Hydra Engine Hoist
✅ Shop Auto-Hydra Drum Brake Lathes
📞 For more tips on maintaining your Auto-Hydra tools, contact our U.S.-based support team or visit the Auto-Hydra homepage for additional resources.
Recommended News


